As many of you should know, Apple has recently launched a new, Multi-Touch capable mouse - the Magic Mouse.
The older mouse didn’t leave the scene as the new one arrived, although
Apple is heavily promoting the new peripheral. The two mice have
something in common - they’re Bluetooth-capable and work with Mac OS X
wirelessly.
Wireless mice are great to use. You feel completely free to handle them any way you want. With Apple mice, the functionality goes above that of traditional mice. They’re even allowed to have their own name, like “John’s Mouse,” or “My Super-Cool Mouse.” But how do you give your mouse a name, or how do you change the name of an Apple wireless mouse, in case you’re the not the first person to use it? This short tutorial will let you in on that secret.
Upon setting up your wireless Apple mouse (whether it’s the former Mighty Mouse, or the new, exquisite Magic Mouse), Mac OS X pairs the device to the computer you’re going to use it with, and automatically assigns it a name. The name is assigned based on your computer’s name (root directory). However, if you want to change it, you can. Here's how.
(don't forget to click on the images for a larger view)
1. With your wireless mouse connected and working, launch System Preferences.
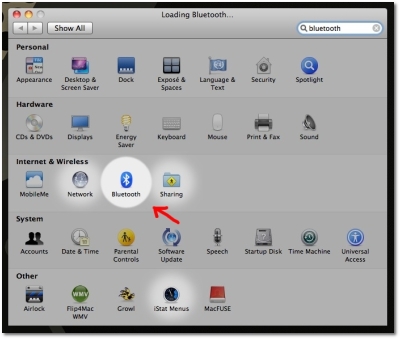
2. For one reason or another, Apple decided not to include the option to rename your paired devices at first glance. So, instead of choosing “Mouse,” choose “Bluetooth.” It should be on the third row down, between “Network and “Sharing.”
3. Once in Bluetooth prefs, select the mouse you want to rename and click the small cogwheel, located under the list of paired devices (the cogwheel is found throughout Mac OS X and typically hides more options).
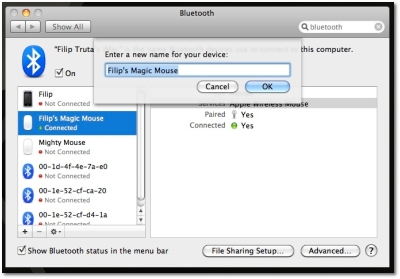
4. As shown above, select “rename.” A drop-down menu will appear containing a field where you can write down the new name of your mouse - as shown in the screenshot below.
5. Hit OK, and close System Prefs. That’s it!
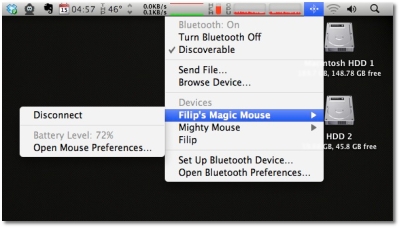
You can now check out your rodent’s new name by clicking on the Bluetooth icon in the menubar, located at the top right side of your Mac’s screen.
Wireless mice are great to use. You feel completely free to handle them any way you want. With Apple mice, the functionality goes above that of traditional mice. They’re even allowed to have their own name, like “John’s Mouse,” or “My Super-Cool Mouse.” But how do you give your mouse a name, or how do you change the name of an Apple wireless mouse, in case you’re the not the first person to use it? This short tutorial will let you in on that secret.
Upon setting up your wireless Apple mouse (whether it’s the former Mighty Mouse, or the new, exquisite Magic Mouse), Mac OS X pairs the device to the computer you’re going to use it with, and automatically assigns it a name. The name is assigned based on your computer’s name (root directory). However, if you want to change it, you can. Here's how.
(don't forget to click on the images for a larger view)
1. With your wireless mouse connected and working, launch System Preferences.
 |
2. For one reason or another, Apple decided not to include the option to rename your paired devices at first glance. So, instead of choosing “Mouse,” choose “Bluetooth.” It should be on the third row down, between “Network and “Sharing.”
 |
3. Once in Bluetooth prefs, select the mouse you want to rename and click the small cogwheel, located under the list of paired devices (the cogwheel is found throughout Mac OS X and typically hides more options).
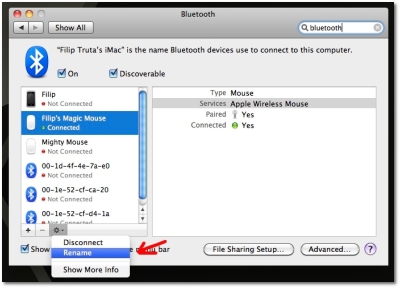 |
4. As shown above, select “rename.” A drop-down menu will appear containing a field where you can write down the new name of your mouse - as shown in the screenshot below.
 |
5. Hit OK, and close System Prefs. That’s it!
You can now check out your rodent’s new name by clicking on the Bluetooth icon in the menubar, located at the top right side of your Mac’s screen.
 |
No comments:
Post a Comment